
uniapp实训-电影(2周)
要完成的页面
- 电影首页
- 电影详情页面
- 影院列表
- 视频列表
- 视频详情
- 个人中心
- 登录页面
相关资源
- 线上预览地址: http://fresh.huruqing.cn
- uniapp官网地址: https://uniapp.dcloud.net.cn/
🕒 day01创建和配置项目
(一) uniapp介绍
uniapp是一个跨端开发框架, 一套代码可以编译到14个平台, 除了uniapp框架之外, 下面是一些常见的跨端开发框架:
- uniapp DCloud(数字天堂) 小程序+vue
- weex 阿里 vue
- taro 京东(凹凸实验室) react
- react-native Facebook react
- flutter Google Dart语言
- pwa Google
- PhoneGap
- ionic
(二) hbuilderx快捷键
(三) 创建项目
(1) 创建项目
使用hbuilderx创建项目 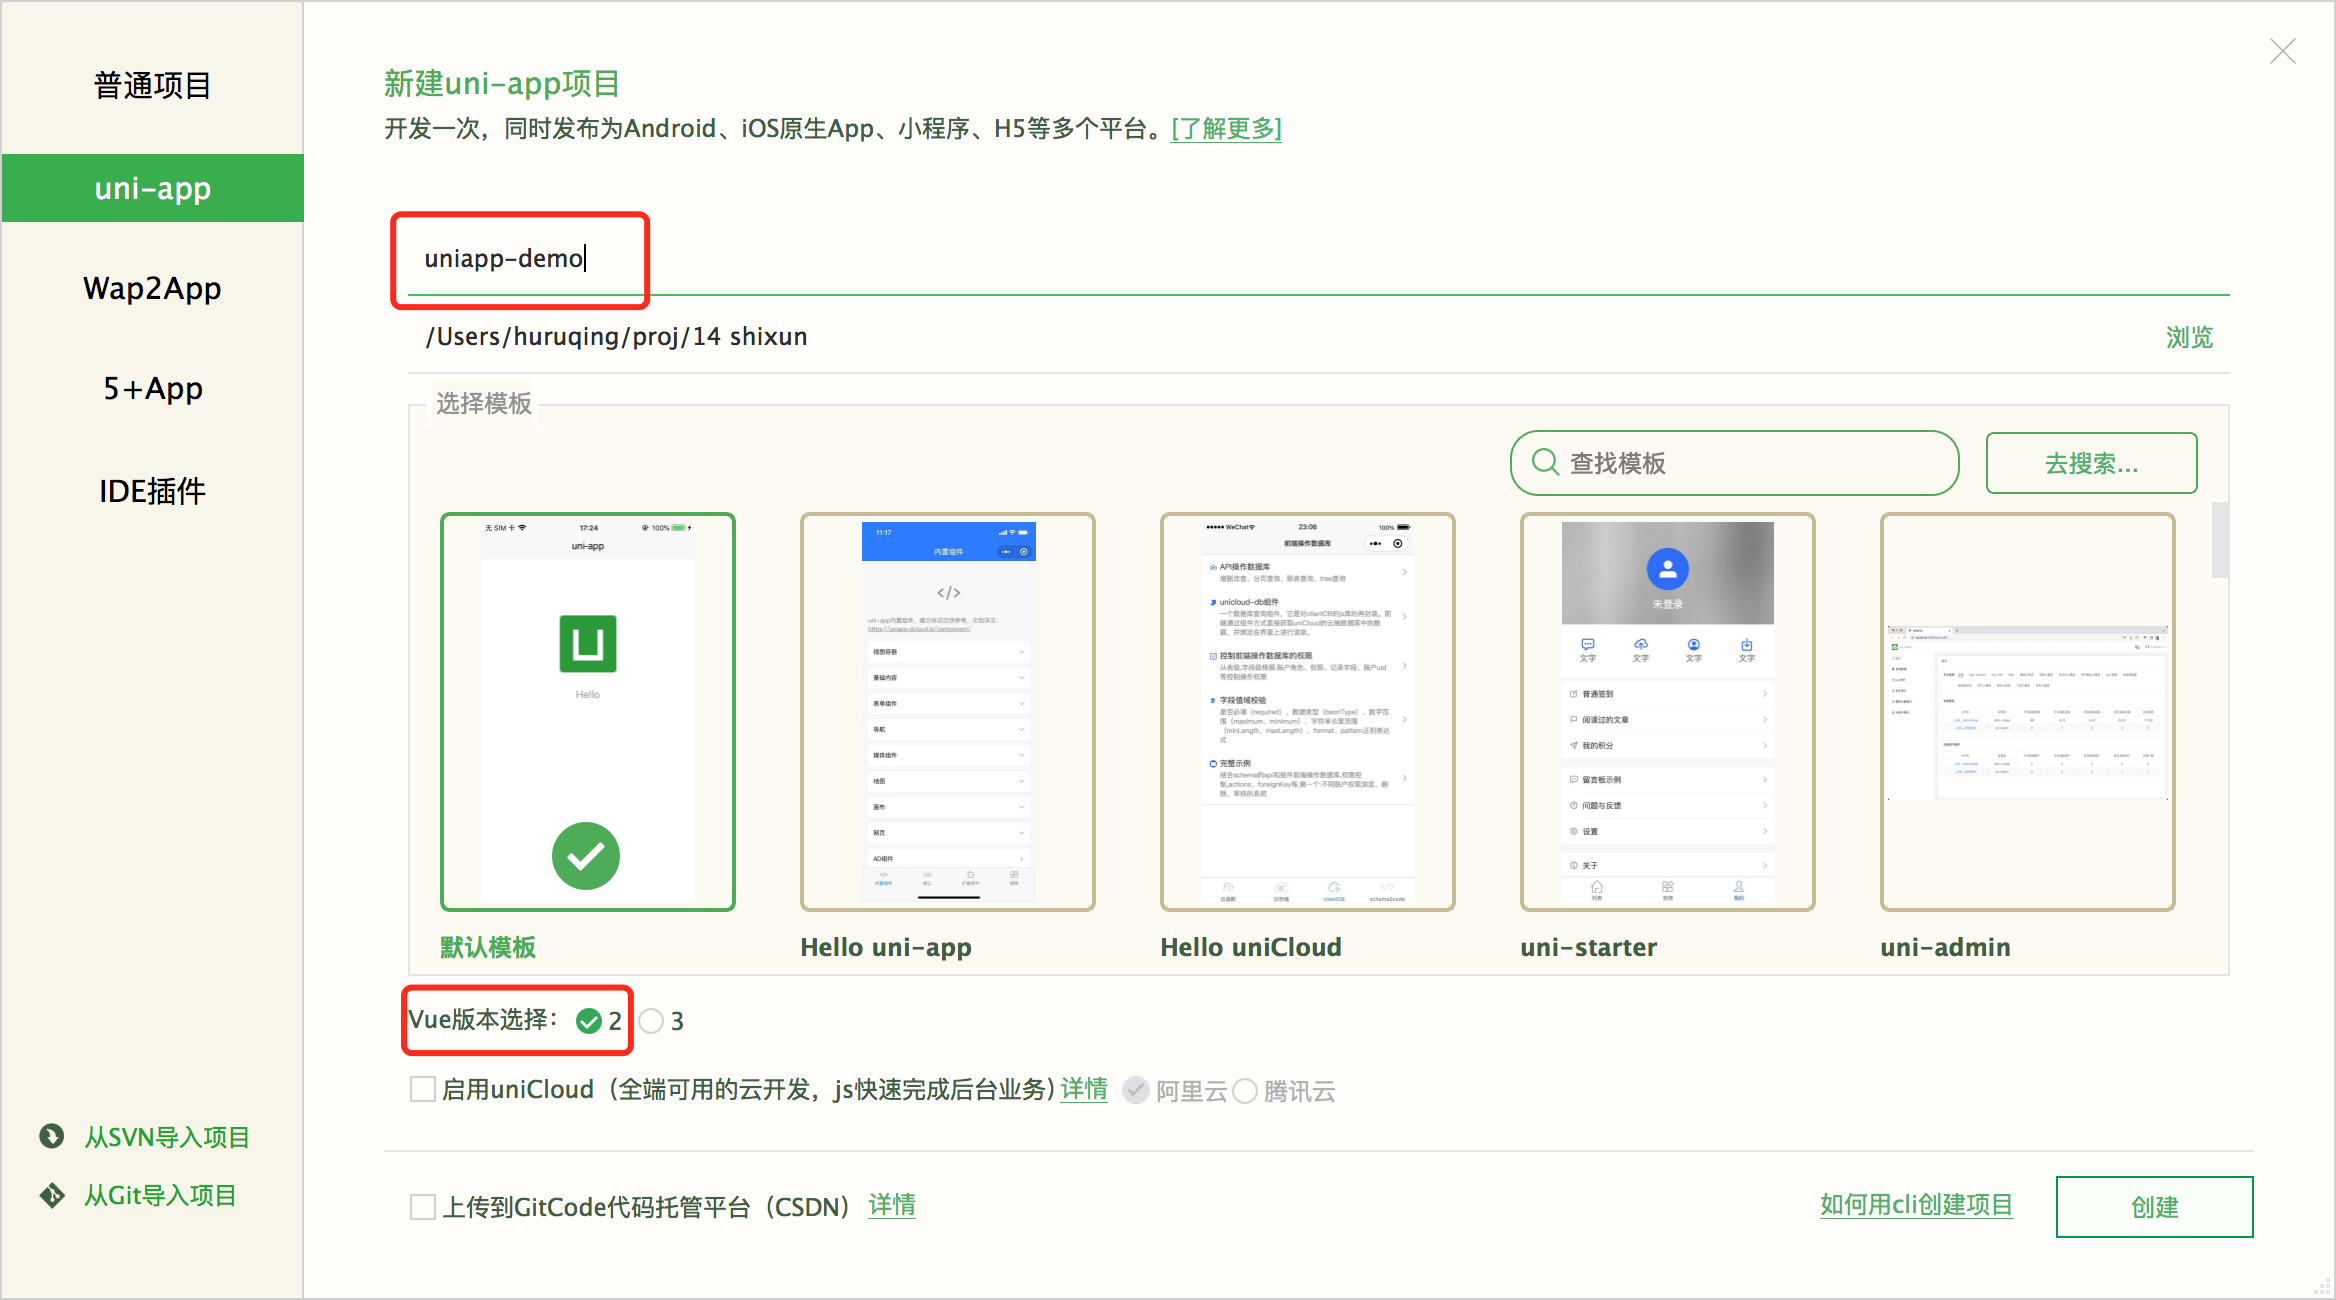
(2) 项目结构
- Main.js 入口文件
- manifest.json项目配置
- pages.json 页面路径和其它配置
- static 静态资源目录
- pages 存放页面文件
(3) 创建页面
在pages文件夹, 右键新建页面
- 可以选择less
- 勾选在pages.json中注册, 则页面可以通过网页地址来访问
(4) 启动项目
点击"播放"按钮或者菜单栏的运行
(四) 静态页面
(1) 什么是静态页面
静态页面: 只是用标签(组件)和样式编写的页面
动态页面: 跟后端有数据交互的页面
(2) 页面适配
uni-app 支持的通用 css 单位包括 px、rpx
rpx 即响应式 px,一种根据屏幕宽度自适应的动态单位。以 750 宽的屏幕为基准,750rpx 恰好为屏幕宽度。
(3) uniapp常用组件
uniapp没有div, p, span等标签, 取代的是组件, 比如:
- view
- text
- image
- navigator
- ...
uniapp组件地址: https://uniapp.dcloud.net.cn/component/progress.html
<template>
	<view class="content">
		<view class="aa">
			2222
		</view>
		<view class="bb">
			3333
		</view>

		<text>aaaaa aaaaa</text>
		<text>bbb bbbbbbb</text>
		<text>bbbbbb bbbb</text>
		<text>bbb bbbbbbb</text>
		<text>bbbbbbbbbb</text>
		<text>bbbbbb bbb</text>

		<image src="https://www.baidu.com/img/pcindex_small.png"></image>

		<navigator url="/pages/classify/classify">分类</navigator>
		<navigator url="/pages/cart/cart">购物车</navigator>
		<navigator url="/pages/my/my">我的</navigator>
	</view>
</template>

<style>
	.aa {
		border: 1px solid red;
		width: 100px;
	}
</style>
(4) 取消默认导航栏
{
    "path": "pages/home/home",
        "style": {
            "navigationBarTitleText": "首页",
                "navigationStyle": "custom" // 自定义导航栏
        }
},
(6) 配置底部tab栏
位置: uniapp官网 => 全局文件 => pages.json页面路由
"tabBar": {
		// 颜色
		"color": "#7A7E83",
		// 选中颜色
		"selectedColor": "#c03d37",
		"borderStyle": "black",
		"backgroundColor": "#ffffff",
		"list": [
			{
				"pagePath": "pages/index/index",  // 页面路径
				"iconPath": "static/img/tab/film.png", // 图标的地址
				"selectedIconPath": "static/img/tab/filming.png", // 被选中时的图标地址
				"text": "首页" // tab栏文字
			},
			{
				"pagePath": "pages/cinema/cinema",
				"iconPath": "static/img/tab/cinema.png",
				"selectedIconPath": "static/img/tab/cinemaing.png",
				"text": "影院"
			},{
				"pagePath": "pages/video/video",
				"iconPath": "static/img/tab/video.png",
				"selectedIconPath": "static/img/tab/videoing.png",
				"text": "视频"
			},
			{
				"pagePath": "pages/my/my",
				"iconPath": "static/img/tab/my.png",
				"selectedIconPath": "static/img/tab/mying.png",
				"text": "我的"
			}
		]
	}
(7) 使用iconfont图标
进入阿里巴巴字体图标库网站: https://www.iconfont.cn/ 注册然后登录
搜索所需图标, 点击购物车, 添加到项目(若没有就新建)
点击资源管理 -> 我的项目 -> 选择font class -> 点击下载到本地
解压, 把文件名修改为font, 把文件夹复制到static目录
在App.vue中导入文件
<style>
	/*每个页面公共css */
	@import './static/font/iconfont.css'
</style>
修改iconfont.css内容
@font-face {
  font-family: "iconfont"; /* Project id 4052636 */
  src: url('~@/static/font/iconfont.woff2?t=1687663323519') format('woff2'),
       url('~@/static/font/iconfont.woff?t=1687663323519') format('woff'),
       url('~@/static/font/iconfont.ttf?t=1687663323519') format('truetype');
}
...
使用图标和修改图标大小和颜色(在任意页面)
<template>
	<view>
			<view class="iconfont icon-roundaddlight"></view>
	</view>
</template>

<style>
	.icon-roundaddlight {
		font-size: 30px;
		color: red;
	}
</style>
网上参考链接: https://www.cnblogs.com/1549983239yifeng/p/14874157.html
(8) 使用uview-ui 库
插件地址: https://ext.dcloud.net.cn/plugin?id=1593
文档地址: https://www.uviewui.com/
(1) 配置uview
打开插件地址, 导入uview到hbuilderx
在uni.scss打末尾添加以下代码
@import '@/uni_modules/uview-ui/theme.scss';在main.js添加以下代码
import App from './App'
import uView from '@/uni_modules/uview-ui' //导入uview

// #ifndef VUE3
import Vue from 'vue'
Vue.config.productionTip = false
Vue.use(uView)  // 使用uview

...
使用: 在任意页面, 随便来个uview的组件
<template>
<view style="padding: 20px;">
		<u-button type="primary" text="确定"></u-button>
		<u-button type="primary" :plain="true" text="镂空"></u-button>
		<u-button type="primary" :plain="true" :hairline="true" text="细边"></u-button>
		<u-button type="primary" :disabled="disabled" text="禁用"></u-button>
		<u-button type="primary" loading loadingText="加载中"></u-button>
	</view>
</template>
(8) uview进阶(后讲)
使用uview-ui库要主要的三个方面
- 组件提供了什么属性
- 组件绑定了什么事件
例1. 导航栏属性和事件
例2. tab栏属性和事件
(五) 生命周期函数
生命周期函数是什么
(1) 应用生命周期 (了解)
也就是app.vue的生命周期
- onLaunch:function () { }, 应用初始化完成触发一次,全局只触发一次;
- onShow: function () {}, 应用启动的时候,或者从后台进入前台会触发;
- onHide: function () {} 应用从前台进入后台触发
(2) 页面生命周期
页面除支持 Vue 组件生命周期外还支持下方页面生命周期函数,
- onLoad() {}, 监听页面加载, 页面加载的时候触发一次
- onShow() {}, 监听页面显示, 页面展示就触发
- onReady() 监听页面的初次渲染完成, 如果渲染速度快,会在页面进入动画完成前触发
- onHide() {}, 监听页面隐藏
- onUnload() {} 监听页面卸载
(六) 路由(页面)跳转和传参
uniapp和小程序的页面有两种:
- 普通页面
- tab栏页面
(1) 页面跳转
通过navigator组件跳转
<navigator url="/pages/order/list/list">非tab页面</navigator>
<navigator open-type="switchTab" url="/pages/demo/demo">tab页面</navigator>
通过js跳转(后面再讲)
// 普通页面跳转
uni.navigateTo({
	url: '/pages/B/B'
})

// 跳转到tab栏页面,跳tab栏页面不能传参
uni.switchTab({
	url: '/pages/index/index'
});

// 后退使用navigateBack
uni.navigateBack();
(2) 跳转和传参(后讲)
跳转时把参数拼接在url的后面
注: 跳转到tab栏页面不能传参
<navigator url="/pages/order/list/list?id=1">非tab页面</navigator>
<navigator open-type="switchTab" url="/pages/demo/demo">tab页面</navigator>
- 通过js进行跳转传参
// 普通页面跳转
uni.navigateTo({
	url: '/pages/B/B?id=1'
})

// 跳转到tab栏页面,跳tab栏页面不能传参
uni.switchTab({
	url: '/pages/index/index'
});
- 接收参数
<script>
	export default {
		data() {
			return {

			};
		},
		onLoad(opt) {
			console.log(opt)
		}
	}
</script>
传参传对象
不能直接传对象
传递方需要先将对象转成字符串
接收方需要将字符串再转成对象
如果url超出长度, 请看此链接
作业:
- 分组找一个合适的项目
- 熟悉常用的组件
- 配置好底部tab栏和uview
- 把上面例子都练习一遍
(七) 数据缓存(后讲)
https://uniapp.dcloud.net.cn/api/storage/storage.html#setstoragesync
<template>
	<view class="">
		<button @click="save">存数据</button>
		<button @click="get">取数据</button>
        <button @click="remove">移除数据</button>
	</view>
</template>

<script>
	export default {

		methods: {
			 save() {
				 uni.setStorageSync('username', '张三');
			 },
			 get() {
				 var data = uni.getStorageSync('username');
				 console.log(data);
			 },
              remove() {
                  uni.removeStorageSync('username');
              }
		}
	}
</script>
--------------------------
🕒 day02/day03 编写静态页面
(一) css基础
常用css样式目录
- 选择器和选择器优先级
- 三个简单样式
- 边框border
- 宽高设置
- 背景颜色
- 圆角设置
- 文字大小、颜色、行高、加粗
- margin 外边距设置
- padding 内边距设置
例1. 选择器和选择器优先级
例1.1 元素选择器和类选择器
<template>
	<view class="">
		<view class="aa bb">11111111</view>
		<view class="aa">222222</view>
	</view>
</template>

<style>
	/* 元素选择器,选择所有的view元素, 给其添加边框 */
	view {
		/* 对边框进行设置 */
		border:1px solid red;
	}
	/* 类选择器 选择class="aa" 的元素进行设置*/
	.aa {
		font-size: 30px;
	}
	.bb {
		/* 设置字体颜色 选择class="bb"的元素进行设置*/
		color: red;
	}
</style>
例1.2 后代选择器
<template>
	<view class="">
		<view class="aa">
			<text>111</text>
			<text>222</text>
			<text>333</text>
		</view>
		<view class="bb">
			<text>111</text>
			<text>222</text>
			<text>333</text>
		</view>
	</view>
</template>

<style>
	.aa text {
		color:red;
	}
	.bb text {
		font-size: 30px;
	}
</style>
例1.3 群组选择器
<template>
	<view class="">
		 <view class="aa">
		 	aaaaaaaaa
		 </view>
		 <view class="bb">
		 	bbbbbbb
		 </view>

		 <text>text222222</text>
	</view>
</template>

<style>
	.aa,.bb,text {
		color: red;
	}
</style>
例1.4 选择器优先级
同等情况下, 后面的会覆盖前面的
选择器越长越优先
<template>
	<view class="box">
		<view class="aa bb">
			哈哈哈哈
		</view>
	</view>
</template>

<style>
	/* 2.选择器越长越优先 */
	.box .aa {
		color: yellow;
	}

	.aa {
		color: red;
	}

	/* 1.同等情况下, 后面的会覆盖前面的 */
	.bb {
		color: green;
	}
</style>
例2. 边框 宽高 背景
<template>
	<view class="box">
		 222222222
	</view>
</template>

<style>
	 .box {
		/* border: 10px solid red; */
		border-bottom: 5px solid red;
		/* 宽高 */
		width: 300rpx;
        width: 20%; /*百分比相对于父元素*/
		height: 300rpx;
		/* 背景 */
		background-color: aqua;
	 }
</style>
例3. 圆角设置
<template>
	<view class="box">
		 <view class="aa"></view>
		 <view class="bb"></view>
	</view>
</template>

<style>
	.aa {
		border: 1px solid red;
		width: 200px;
		height: 100px;
		/* 设置圆角 */
		border-radius: 50px;
	}
	.bb {
		margin: 50px;
		border: 1px solid blue;
		width: 200px;
		height: 200px;
		border-radius: 50%;
	}
</style>
例4. 文字大小、颜色、行高、加粗
<template>
	<view class="box">
		 哈哈哈哈哈哈哈哈哈哈哈
		 哈哈哈哈哈哈哈哈哈哈哈
		 哈哈哈哈哈哈哈哈哈哈哈
		 哈哈哈哈哈哈哈哈哈哈哈
		 哈哈哈哈哈哈哈哈哈哈哈
		 哈哈哈哈哈哈哈哈哈哈哈
		 哈哈哈哈哈哈哈哈哈哈哈
		 哈哈哈哈哈哈哈哈哈哈哈
	</view>
</template>

<style>
	.box {
		width: 600px;
		/* height: 100px; */
		/* border: 1px solid; */
		/* 文字大小 */
		font-size: 30px;
		/* 文字颜色 */
		color: #999;
		/* 设置行高 */
		/* line-height: 50px; */
		line-height: 1; /*1倍字体大小*/
		/* 字体加粗 */
		font-weight: bold;
	}
</style>
例5. margin外边距设置
元素边框跟外边的距离
<template>
	<view class="box">
		 <view class="aa"></view>
		 <view class="bb"></view>
	</view>
</template>

<style>
	.aa,.bb {
		border: 1px solid red;
		width: 300px;
		height: 150px;
	}
	.aa {
		/* 跟上面的距离为20px */
		margin-top: 20px;
		margin-left: 20px;
		margin-right: 20px;
		margin-bottom: 20px;
	}
	.bb {
		/* 合并写法 */
		margin:20px;
	}
</style>
例6. padding 内边距
元素边框跟元素内容的距离
<template>
	<view class="box">
		 哈哈哈哈哈哈哈哈哈
		 哈哈哈哈哈哈哈哈哈
		 哈哈哈哈哈哈哈哈哈
		 哈哈哈哈哈哈哈哈哈
		 哈哈哈哈哈哈哈哈哈
	</view>
</template>

<style>
	.box {
		width: 300px;
		border: 1px solid red;
		/* padding-top: 10px;
		padding-left: 10px;
		padding-right: 10px;
		padding-bottom: 10px; */

		/* 合并写法 */
		padding: 10px;
	}
</style>
(二) css进阶
(1) 定位
例1. 固定定位
例1.1 简单例子
<template>
	<view class="box">
		<text>test</text>
	</view>
</template>

<style>
	text {
		width: 100px;
		border: 1px solid red;
		background-color: gray;
		padding: 5px;
		/* 1.将text元素设置为固定定位 */
		position: fixed;
		/* 2.设置text元素在网页中的位置 */
		/* top: 10px; */
		/* left: 20px; */
		right: 20px;
		bottom: 20px;
	}
</style>
例1.2 半透明遮罩层
<template>
	<view class="box">
		 222222222222
	</view>
</template>

<style>
	 .box {
		 position: fixed;
		 background-color: rgba(0, 0, 0, 0.5);
		 top: 0;
		 bottom: 0%;
		 left: 0;
		 right: 0;
	 }
</style>
例2. 相对定位和绝对定位
例2.1 一个简单例子
<template>
	<view class="box">
		<view class="aa">
			托尔斯泰
		</view>
	</view>
</template>

<style>
	.box {
		border: 1px solid red;
		height: 300px;
		width: 300px;
		/* 1.父元素设置为相对定位 */
		position: relative;
	}
	.aa {
		background-color: aqua;
		width: 100px;
		height: 50px;
		/* 2.子元素设置为绝对定位 */
		position: absolute;
		/* 3.设置子元素在父元素中的位置 */
		bottom: 0;
		right: 0;
	}
</style>
例2.2 购物车上的数字
<template>
	<view class="box">
		<image src="../../static/img/cart.png" mode=""></image>
		<view class="aa">
			8
		</view>
	</view>
</template>

<style>
	.box {
		margin: 50px;
		height: 100px;
		width: 100px;
		/* 1.父元素设置为相对定位 */
		position: relative;
	}
	image {
		width: 100px;
		height: 100px;
	}
	.aa {
		background-color: red;
		color: #fff; /*白色*/
		width: 30px;
		height: 30px;
		border-radius: 50%;
		/* 2.子元素设置为绝对定位 */
		position: absolute;
		/* 3.设置子元素在父元素中的位置 */
		 right: -10px;
		 top:-6px;
	}
</style>
(2) 盒子尺寸计算方式
<template>
	<view class="box">
		 222222222
	</view>
</template>

<style>
	.box {
		width: 100%;
		border: 5px solid red;
		padding: 50px;
		/* box-sizing 设置盒子尺寸计算方式*/
		/* 设置为border-box的时候, 被元素加边框和padding, 元素不会变大 */
		box-sizing: border-box;
	}
</style>
(3) 弹性盒子
例1. 水平对齐和垂直对齐方式
<template>
	<view class="box">
		 <view class="item">1</view>
		 <view class="item">2</view>
		 <view class="item">3</view>
		 <text>5</text>
	</view>
</template>

<style>
	.box {
		border: 1px solid red;
		height: 300px;
		/* 将父元素设置为弹性盒子 */
		display: flex;

		/* 水平方向的五种对齐方式 */
		justify-content: center; /*居中*/
		justify-content: flex-end; /*右对齐*/
		justify-content: flex-start; /*左对齐*/

		/* 两端对齐和分散对齐 */
		justify-content: space-between;
		justify-content: space-around;

		/* 垂直方向的三种对齐方式 */
		align-items: center;
		align-items: flex-end;
		align-items: flex-start;

	}
	 .item,text {
		 border: 1px solid gray;
		 width: 60px;
		 height: 50px;
	 }
</style>
例2. 剩余空间分配
例21. 剩余空间分配
<template>
	<view class="box">
		<view class="item a">1</view>
		<view class="item b">2</view>
		<view class="item c">3</view>
	</view>
</template>

<style>
	.box {
		display: flex;
		height: 300px;
		border: 1px solid blue;
	}
	.item {
		width: 60px;
		 height: 50px;
		 border: 1px solid red;
	}
	.a {
		flex-grow: 1;
	}
	.b {
		flex-grow: 3;
	}
	.c {
		flex-grow: 1;
	}
</style>
例2.2 剩余空间分配应用
<template>
	<view class="box">
		<image src="https://pic.maizuo.com/usr/movie/6d31257bd0c897f0a953b7097853d627.jpg" mode=""></image>
		<view class="aa">
			pppppppp
		</view>
		<text>购票</text>
	</view>
</template>

<style>
	.box {
		 border: 1px solid red;
		 padding: 10px;
		 display: flex;
		 justify-content: space-between;
		 align-items: center;
	}
	image {
		width: 66px;
		height: 100px;
	}
	.aa {
		border: 1px solid blue;
		flex-grow: 1;
		margin-left: 5px;
	}
	text {
		border: 1px solid;
		width: 60px;
		height: 30px;
	}
</style>
例3. 子元素纵向排列
<template>
	<view class="box">
		<view class="item">1</view>
		<view class="item">2</view>
		<view class="item">3</view>
	</view>
</template>

<style>
	.box {
		 border: 1px solid red;
		 height: 300px;
		 display: flex;
		 /* 设置子元素排列方式 */
		 flex-direction: column;
		 /* 纵向排列之后, 对齐方式跟原来相反 */
		 align-items: center;
		 justify-content: space-around;
	}

	.item {
		width: 100px;
		height: 50px;
		border: 1px solid;
	}
</style>
应用: 电影个人中心的订单
<template>
	<view class="box">
		<view class="item">
			<text class="iconfont icon-dianyingpiaoiocn"></text>
			<text>电影</text>
		</view>
		<view class="item">
			<text class="iconfont icon-31quanbushangpin"></text>
			<text>商品</text>
		</view>
	</view>
</template>

<style>
	page {
		background-color: #f4f4f4;
	}
	.box {
		 height: 160rpx;
		 display: flex;
		 align-items: center;
		 justify-content: space-around;
		 background-color: #fff;
	}

	.item {
		 width: 50%;
		 height: 100%;
		 /* 设置为弹性盒子 */
		 display: flex;
		 /* 子元素排成一列 */
		 flex-direction: column;
		 align-items: center;
		 justify-content: center;

	}
	.iconfont {
		font-size: 40px;
	}
	.icon-dianyingpiaoiocn {
		color: #f03d37;
	}
	.icon-31quanbushangpin {
		color: #55dac8;
	}
</style>
例4. 多行排列
使用flex-wrap来设置是否要换行
<template>
	<view class="box">
		<view class="item">
			<image src="http://static.huruqing.cn/fresh/r1.png" mode=""></image>
			<text>时令鲜果</text>
		</view>
		<view class="item">
			<image src="http://static.huruqing.cn/fresh/r1.png" mode=""></image>
			<text>时令鲜果</text>
		</view>
		<view class="item">
			<image src="http://static.huruqing.cn/fresh/r1.png" mode=""></image>
			<text>时令鲜果</text>
		</view>
		<view class="item">
			<image src="http://static.huruqing.cn/fresh/r1.png" mode=""></image>
			<text>时令鲜果</text>
		</view>
		<view class="item">
			<image src="http://static.huruqing.cn/fresh/r1.png" mode=""></image>
			<text>时令鲜果</text>
		</view>
		<view class="item">
			<image src="http://static.huruqing.cn/fresh/r1.png" mode=""></image>
			<text>时令鲜果</text>
		</view>
		<view class="item">
			<image src="http://static.huruqing.cn/fresh/r1.png" mode=""></image>
			<text>时令鲜果</text>
		</view>
		<view class="item">
			<image src="http://static.huruqing.cn/fresh/r1.png" mode=""></image>
			<text>时令鲜果</text>
		</view>
	</view>
</template>

<style>
	page {
		background-color: #f4f4f4;
	}

	.box {
		background-color: #fff;
		display: flex;
		/* 排不下的时候, 换行 */
		flex-wrap: wrap;
	}

	.item {
		width: 25%;
		height: 95px;
		/* 添加边框, 元素不变大 */
		box-sizing: border-box;
		display: flex;
		flex-direction: column;
		align-items: center;
		justify-content: center;
	}

	.item image {
		width: 45px;
		height: 45px;
	}
</style>
(4) 子元素在父元素内水平居中垂直居中
用弹性盒子(略)
使用相对定位和绝对定位
<template>
	<view class="box">
		<view class="aa">

		</view>
	</view>
</template>

<style>
	.box {
		border: 1px solid red;
		height: 300px;
		width: 300px;
		position: relative;
	}

	.aa {
		border: 1px solid blue;
		width: 100px;
		height: 100px;
		/* border-radius: 50%; */
		position: absolute;
		top: 50%;
		left: 50%;
		margin-left: -50px;
		margin-top: -50px;
	}
</style>
应用
<template>
	<view class="box">
		<image class="bg" src="http://p0.meituan.net/moviemachine/85421c24ca4a9bfcec76e4af80188fa8208505.png" mode=""></image>
		<image class="play" src="https://s0.meituan.net/bs/myfe/canary/file/asgard/images/media/video-btn-play.png" mode=""></image>

	</view>
</template>

<style>
	.box {
		/* border: 1px solid red; */
		position: relative;
	}
	.bg {
		width: 100%;
		height: 250px;
	}
	.play {
		width: 80px;
		height: 80px;
		position: absolute;
		top:50%;
		left: 50%;
		margin-left: -40px;
		margin-top: -20px;
	}
</style>
(三) 静态页面实战
(1) 个人中心
<template>
	<view>
		 <u-navbar
				title="个人中心"
				leftText="返回"
				:autoBack="true"
			>
		</u-navbar>

		<!-- 头部 header -->
		<view class="header">
			<image src="http://fresh.huruqing.cn/img/bg2.78d35cdc.png" mode=""></image>
			<text>立即登录</text>
		</view>

		<!-- 列表 list -->
		<view class="list">
			<view class="item">
				<text>我的订单</text>
				<u-icon name="arrow-right"></u-icon>
			</view>
			 <view class="item">
			 	<text>收藏</text>
			 	<u-icon name="arrow-right"></u-icon>
			 </view>
			 <view class="item">
			 	<text>足迹</text>
			 	<u-icon name="arrow-right"></u-icon>
			 </view>
		</view>

		<!-- 底部 footer -->
		<view class="footer">

		</view>
	</view>
</template>

<style>
	page {
		background-color: #f4f4f4;
	}
	/* 头部 */
	.header {
		display: flex;
		position: relative;
	}
	.header image {
		width: 100%;
	}
	.header text {
		position: absolute;
		top: 44rpx;
		left: 54rpx;
		color: #fff;
	}

	/* 列表 */
	.list {
		background-color: #fff;
		margin-top: 20rpx;
	}
	.list .item {
		height: 88rpx;
		border-bottom: 1px solid #606266;
		display: flex;
		justify-content: space-between;
		align-items: center;
		margin-left: 30rpx;
		margin-right: 30rpx;
	}
	/* 最后一个元素不要边框 */
	.list .item:last-child{
		border-bottom: none;
	}
</style>
(2) 视频
<template>
	<view>
		<video src="https://vod.pipi.cn/fec9203cvodtransbj1251246104/edced4778602268010651204870/v.f42905.mp4">
		</video>
	</view>
</template>

<style>
	video {
		width: 100%;
	}
</style>
(3) 视频的描述
<template>
	<view class="box">
		<view class="left item">
			<image src="http://p0.meituan.net/moviemachine/c22241bf0509d3fde59754cc8501904999243.png" mode=""></image>
			<text>南归电影</text>
		</view>
		<view class="right item">
			<view class="icon">
				<u-icon name="photo" color="#2979ff" size="28"></u-icon>
				<text>66</text>
			</view>
			<view class="icon">
				<u-icon name="photo" color="#2979ff" size="28"></u-icon>
				<text>66</text>
			</view>
			<u-icon name="photo" color="#2979ff" size="28"></u-icon>
		</view>
	</view>
</template>

<style>
	page {
		background-color: #f4f4f4;
	}

	.box {
		height: 50px;
		display: flex;
		background-color: #fff;
	}
	.box .item {
		width: 50%;
		height: 100%;
	}
	.box image {
		width: 60rpx;
		height: 60rpx;
	}

	.box .left {
		display: flex;
		align-items: center;
		padding-left: 15px;
	}
	.box .left text {
		margin-left: 15px;
	}

	.box .right {
		display: flex;
		align-items: center;
		justify-content: space-between;
		padding-left: 10px;
		padding-right: 10px;
	}
	.box .right .icon {
		display: flex;
		align-items: center;
	}

</style>
(4) uview组件的使用
导航栏组件
<template>
	<view>
		<u-navbar leftText="返回"
		title="个人中心"
		:autoBack="true"
		rightText="编辑"
		placeholder
		/>

		<view class="aa">
			2222222
		</view>
	</view>
</template>
自定左侧或右侧的内容
<template>
	<view>
		<u-navbar leftText="返回" title="个人中心" :safeAreaInsetTop="false">
			<view class="u-nav-slot" slot="left">
				222222
			</view>
		</u-navbar>
	</view>
</template>
轮播图组件
<template>
	<u-swiper
	:list="list1"
	height="200"
	indicator
	indicatorMode="dot"
	:autoplay="true"
	interval="500"
	:circular="true"
	/>
</template>

<script>
	export default {
		data() {
			return {
				list1: [
					'https://cdn.uviewui.com/uview/swiper/swiper1.png',
					'https://cdn.uviewui.com/uview/swiper/swiper2.png',
					'https://cdn.uviewui.com/uview/swiper/swiper3.png',
				]
			}
		}
	}
</script>
(四) 作业
编写电影项目的静态页面
--------------------------
🕒 day04 JavaScript基础
(一) js里的输出语句
<script>
    // 输出到控制台
    console.log('我爱web前端');
    // 弹窗
    alert('哈哈哈哈哈');
</script>
(二) 变量
js变量就是个容器, 是用来存放数据的
例1. 五种简单数据类型
<script>
    // 1.存放数字类型
   var money = 100;
   // 2.存字符串类型
   var username = '老胡';
   var username2 = "老胡";
   var username3 = `老胡`;
   // 3.存布尔类型的数据
   var isOpen = true;
   var isOpen2 = false;
   // 4.存空
   var obj = null;
   // 5.声明变量时, 不赋值, 则它的值为undefined
   var age;

   console.log('money的类型:',typeof money);
   console.log('username的类型:',typeof username);
   console.log('isOpen的类型:',typeof isOpen);
   console.log('obj的类型:',typeof obj);  // object
   console.log('age的类型:',typeof age);
</script>
例2. 变量的赋值
<script>
    // 变量的声明
    var money;
    console.log(1, money);  // undefined
    // 变量的赋值, =叫做赋值符号
    money = 10000;
    console.log(2,money);
    money = 110;
    console.log(3,money);
</script>
例3. 常量
<script>
    // 常量的声明和赋值
    const PI = 3.1415926535;
    PI = 6666;
    console.log(PI);
</script>
例4. 变量的命名规则
- 使用英文命名, 名称可以体现变量的用途
- 当时变量名称由两个单词组成的时候, 使用小驼峰写法
- 变量首字符必须是
$, _, 字母开始, 其它字符可以是$, _, 字母, 数字 - 有些系统的关键字和保留字不能用来做变量名称
// 存放年龄
var age = 100;
var hobby = '篮球';
// 双单词变量
var goodsList;
// 关键字和保留字不能做变量名称
var break = 222;
例5. 复杂类型1-对象
<script>
    // 声明一个对象变量, 用来存放一个人的信息
    var person = {
        // 键值对: 左边是键(属性,也是对象), 右边叫值
        username: '张三',
        age: 100,
        hobby: '犯罪',
        address: '外国'
    };

    // 读取对象的信息
    console.log('用户名:',person.username);
    console.log('用户的爱好:',person['hobby']);

    // 修改对象的信息
    person.username = '李四';
    person.age = 80;
    console.log('person:', person);
</script>
例6. 复杂数据类型2-数组
<script>
    // 数组(列表), a,b,c,d...叫做数组的成员
    var list = ['a', 'b', 'c', 'd', 'e','f'];
    // 读取数组的值
    console.log('第一个成员:',list[0]); // 第一个成员的值,0叫做数组的下标
    console.log('第二个成员',list[1]); // 第二个成员的值
    // 数组的长度
    console.log('数组的长度:', list.length);
    // 最后一个成员
    console.log('最后一个成员:',list[list.length-1]);

    // 修改数组成员的值
    list[3] = 'xx';
    console.log('list',list);
</script>
练习:
声明数组
- 声明一个数组, 存放本组同学的名单
- 打印数组的第一个成员和最后一个成员
<script>
		var studentList = [
			{
				studentId: '001',
				username: '张三',
				age: 18,
				birthland: '济南'
			},{
				studentId: '002',
				username: '李四',
				age: 18,
				birthland: '济南'
			}
		]

		console.log(studentList[0]);
		console.log(studentList[studentList.length-1]);
</script>
打开网站: http://fresh.huruqing.cn/
- 声明一个对象, 存放首页商品列表的其中一个商品信息
- 声明一个对象, 存放购物车列表的其中一个商品信息
- 声明一个数组, 存放订单列表
<script>
	var goods =  {
		id: '2342342432',
		name: '【山东】金秋红蜜桃',
		describe: '基地果园现摘现发 鲜甜红润肉厚 富含维生素',
		price: 5780,
		saleNum: 9998
	}
</script>
(三) 运算符
(1) 常见运算符
+ - * /特别注意: 字符+其它 = 字符串- % 取余数
- = 赋值
==和===判断两个两个变量是否相等=
<script>
    var a = 20;
    var b = 30;
    var c = '20';

    // +-*/
    console.log('a+b=',a+b);
    console.log('a-b=',a-b);
    console.log('a*b=',a*b);
    console.log('a/b=',a/b);

    // 取余
    console.log('a%b=',a%b);

    // 计算的结果可以声明一个变量来存储
    var result = a+b*c/a;
    console.log('result=',result);

    // 判断是否相等
    console.log('a==c',a==c); // true 等于
    console.log('a===c',a===c); // true 恒等于/全等于

    // 注意:等有一个加数是字符串的时候,就是字符串拼接, 而不是相加
    console.log('a+c=',a+c);
    console.log('张三'+'李四');
</script>
(2) 逻辑与和逻辑或
- 逻辑与 && 表示并且的意思 必须两个都为true结果才为true
- 逻辑或 || 表示或者的意思 只要有一个为true, 结果就为true
var a = true;
var b = true;
var c = false;

var m = a&&b;
var n = a&&c;

var x = a||b;
var y = a||c;
(四) 流程语句
三种语句
- 顺序, js代码默认是从上往下去执行的
- 分支结构
- 循环结构
例1. 顺序结构
<script>
console.log(1);
console.log(2);
console.log(3);
</script>
例2. 分支结构
例2.1 if else举例
<script>
    // isRain是否下雨
    var isRain = false;

    // 如果isRain为true,则执行它后面{}的代码, 否则执行else后面的代码
    if(isRain) {
        console.log('我就带伞出门');
    } else {
        console.log('我就带帽出门');
    }
</script>
例2.2 自动转换规则
- if后面括号里的变量会自动转换类型, 转换成布尔类型
- undefined, null, 0, 200, 一般情况下, 变量的意思包含"空,没有"的时候, 会转换成false, 否则转成true
<script>
    var a = 0;
    // a会自动转换为false, 所以打印2222
    if (a) {
        console.log(11111);
    } else {
        console.log(22222);
    }
</script>
例2.3 三目运算符
<script>
    var isRain = true;
  	var msg = isRain?'今天下雨了':'今天没下雨';
  	console.log(msg);
</script>
例3. 循环结构
例3.1 简单的for循环
for循环4部分: 1.循环变量初始值 2.判断条件 3.修改循环变量 4.循环体
第一次执行的顺序: 1 => 2 => 4 => 3
<script>
	for (var i = 0; i < 3; i++) {
		console.log('i=', i);
	}
</script>
例3.2 打印所有的数组成员(数组遍历)
<script>
    var list = [
        "张三",
        "李四",
        "王五",
        "陈六",
        "林七",
    ]

    for(var i=0;i<list.length;i++) {
        console.log(list[i]);
    }
</script>

<script>
	var list = [
		{name: "张三",age:18},
		{name: "李四",age:18},
		{name: "王五",age:18},
		{name: "陈六",age:18},
		{name: "林七",age:18}
	]
	// 打印所有的名字
	for(var i=0;i<list.length;i++) {
		console.log(list[i].name);
	}
</script>
例3.3 数字累加
<script>
    var sum = 0;
    for (var i = 1; i <= 100; i++) {
        sum = sum + i;
        console.log(i, sum);
    }
</script>
(五) 函数和方法
知识点:
- 函数的声明和调用
- 函数传参
- 函数的返回值
- 方法和api
例1. 函数的声明和调用
- 打印3遍1到5
- 用函数打印3遍1到5
// 声明了一个函数, 名字叫say
function say() {
  console.log(1);
  console.log(2);
  console.log(3);
  console.log(4);
  console.log(5);
}

say();
say();
say();
例2. 函数传参
- 编写一个两数相加的函数
- 编写一个两数之间累加的函数
// 声明了一个函数, 名字叫add, 实现两数相加
function add(num1, num2) {
    var sum = num1 + num2;
    console.log(sum);
}
add(10,20);

var a = 100;
var b = 200;
add(a,b);

// 声明一个函数, 实现两数的累加
function count(min,max) {
  var sum = 0;
  for (var i = min; i <= max; i++) {
    sum = sum + i;
  }
  console.log(sum);
}

count(1,100);
count(1,10);
例3. 函数的返回值
- 没有返回值 调用者不在乎结果
- 有返回值 调用者需要得到一个结果
// 两数的累加
function count(min,max) {
  var sum = 0;
  for (var i = min; i <= max; i++) {
    sum = sum + i;
  }
  return sum
}

var result = count(1,100);
console.log('调用结果', result);
例4. 方法和api
方法和api其实是函数在不同场景下的另外一个名字
var obj = {
    name: 'zs',
    age: 18,
    // 对象obj的一个方法
    say() {
        console.log('张三会说话');
    }
}
(六) 内置函数
数组常用方法(数组的api)
- join()
- push()
- pop()
- includes()
- filter()
- map()
- slice()
- splice()
1. join()
把数组变成字符串
var arr = ['张三','李四','王五'];
// 无参数
var str = arr.join();
console.log(str);

// 一个参数: 连接符, 默认用逗号进行连接
var str = arr.join(' ==> ');
console.log(str);
2. push()和pop()
pop() 删除数组的最后一个元素并返回删除的元素。 push() 向数组的末尾添加一个或更多元素,并返回新的长度。
var arr = ['张三','李四','王五'];
arr.push('陈六'); // 从后面添加一个成员
console.log(arr);

arr.pop(); // 删除最后一个成员
console.log(arr);
3. includes()
 var arr = ['张三','李四','王五'];

var boo1 = arr.includes('张三');
console.log('boo1',boo1);

var boo2 = arr.includes('李三');
console.log('boo2',boo2);
4. filter()
检测数组元素,并返回符合条件所有元素的数组。
// 成员是基本数据类型
var arr = [18, 28, 13, 48, 48];
// 找出大于20的成员
var newArr = arr.filter(function(item) {
    return item > 20;
});
console.log(newArr);


// 数组成员是引用数据类型
var arr = [
  { name: "张三", age: 18 },
  { name: "李四", age: 28 },
  { name: "王五", age: 13 },
  { name: "李三", age: 48 },
  { name: "陈六", age: 48 },
];
// 找出年龄大于20的成员
var newArr = arr.filter(function(item) {
    return item.age > 20;
})
console.log(newArr);

// 找出名字带"三"的成员
var newArr = arr.filter(function(item) {
    return item.name.includes('三');
})
console.log(newArr);
5. map()
对原来成员进行修改, 返回一个新的数组, 新的数组跟原来数组长度一样, 但新数组成员可以与原数组成员有关系, 也可以没有关系
var arr = [
  { name: "张三", age: 18 },
  { name: "李四", age: 28 },
  { name: "王五", age: 13 },
  { name: "张三", age: 48 },
  { name: "陈六", age: 48 },
];

// 给数组每一个成员添加两个属性sex和address
  var newArr = arr.map(function(item,index) {
    item.sex = '未知';
    item.address = '未知';
    return item;
  });
  console.log(newArr);

// 生成一个新的数组, 数组成员由年龄组成
 var newArr = arr.map(function(item,index) {
    return item.age;
  });
  console.log(newArr);

// 生成一个新的数组, 数组成员全部为'aa', 此时得到的新数组跟原数组没有任何关系
 var newArr = arr.map(function(item,index) {
    return 'aa';
  });
  console.log(newArr);
6. slice()
选取数组的一部分,并返回一个新数组。
var arr = [
    {name:'张三',age:18},
    {name:'李四',age:28},
    {name:'王五',age:13},
    {name:'张三',age:48},
    {name:'陈六',age:48},
  ];

  // 截取下标为1-3的数组成员
  var arr2 = arr.slice(1,3);
  console.log(arr2);

  var arr3 = arr.slice(2);
  console.log(arr3);
7. splice()
可以删除数组中任意位置的成员, 还可以替换成员, 此方法会改变原来数组
// splice可以删除任意位置的成员(会改变原数组)
var arr = ['a','b','c','d','e'];
// 1. 删除成员:从位置1开始, 删除1个
arr.splice(1,1);
console.log(arr);

// 第一个参数表示删除开始的下标, 第二个参数表示删除的个数
arr.splice(2,2);
console.log(arr);
练习和作业
计算总价
// 商品数组列表
var goodsList = [
  {
    productId: "94217104",
    buyNum: 1,
    masterName: "【山西】红富士苹果 8-10枚5斤装(果径80mm/枚)",
    slaveName: "生态基地种植 饱满圆润脆甜 皮薄肉厚多汁",
    userId: "60d6f0b08f119d3e25af8cef",
    price: "3480",
    cartId: "61c285c90ab3e6758a54904f",
  },
  {
    productId: "104356809",
    buyNum: 1,
    masterName: "【云南】冰糖心丑苹果",
    slaveName: "原产基地直供 脆甜多汁爽口 自然糖心结晶",
    userId: "60d6f0b08f119d3e25af8cef",
    price: "3990",
    cartId: "61c2edee0ab3e6758a549055",
  },
  {
    productId: "31129853",
    buyNum: 3,
    masterName: "四川安岳黄柠檬 3斤装(单果90-110g)",
    slaveName: "采自“中国柠檬之都” 个头圆润均匀 地道酸爽十足",
    userId: "60d6f0b08f119d3e25af8cef",
    price: "2390",
    cartId: "61c9bfd76a92be12aba9afd1",
  },
  {
    productId: "97305541",
    buyNum: 2,
    masterName: "【四川】新鲜青柠檬 3斤(单果90-110g)",
    slaveName: "果园现摘现发 清新酸爽怡人 个头圆润饱满",
    userId: "60d6f0b08f119d3e25af8cef",
    price: "1990",
    cartId: "61c9bfde6a92be12aba9afd2",
  },
  {
    productId: "88651149",
    buyNum: 2,
    masterName: "【福建】黄金百香果 大果 (单果70-100g)",
    slaveName: "醇香自然圆润 酸甜多汁可口 富含多种维生素",
    userId: "60d6f0b08f119d3e25af8cef",
    price: "5350",
    cartId: "61c9bfe76a92be12aba9afd3",
  },
];

// 被选中的商品id数组
var idList = [
  "61c9bfe76a92be12aba9afd3",
  "61c9bfde6a92be12aba9afd2",
  "61c9bfd76a92be12aba9afd1",
];

// 计算总价
查找用户
var users = [
  {
    name: "张三",
    sex: 1, // 男
    age: 18,
    skill: [
      "song", // 唱歌
      "speak", // 说话
      "eat", // 吃饭
    ],
  },
  {
    name: "李四",
    sex: 0, // 女
    age: 23,
    skill: [
      "play", // 玩
      "speak",
      "eat",
    ],
  },
  {
    name: "王五",
    sex: 1,
    age: 34,
    skill: [
      "song",
      "sleep", // 睡觉
      "eat",
    ],
  },
  {
    name: "赵六",
    sex: 0,
    age: 19,
    skill: [
      "song",
      "sleep",
      "dance", // 跳舞
    ],
  },
];

function findUser(users) {
  // 请在此处补齐代码, 筛选出同时具有"speak"和"song"技能的用户, 并将他们的名字, 性别, 年龄和技能用中文在控制台打印出来

}
改造数组
将以下数组成员变成 {label:'xxx', value:'xxxx'} 的形式, 其中label对应数组成员的name属性, value对应数组成员的id属性
var list = [{"name":"梁芳","sex":"女","id":"001"},{"name":"萧艳","sex":"男","id":"002"},{"name":"宋洋","sex":"女","id":"003"},{"name":"卢伟","sex":"男","id":"004"},{"name":"康杰","sex":"男","id":"005"}]

// var newList = [{label: '梁芳', value: '001'}, ....];
(七) 模块导入和导出
- 导出
exportexport default
- 导入
import xxx from xxximport {xxx} from xxx
例1. export
使用export 导出的模块需要使用 import {xxx} from xxx进行导入
// demo.js 导出两个变量
export var aa = 100;
export var bb = 200;
导入
<template>
	 <view class="">export</view>
</template>

<script>
	import {aa,bb} from './demo';
	console.log('aa',aa);
	console.log('bb',bb);
</script>
例2. export default
使用export default导出的模块需要使用 import xxx from xxx进行导入
// 导出一个对象
export default {
 	name: '张三',
 	age: 18
 };
导入: 使用export default导出时, 导入的变量名随意
<template>
	 <view class="">export</view>
</template>

<script>
	import bb from './demo.js';
	console.log(bb);
</script>
--------------------------
🕒 day05 vue框架语法
vue框架
(1) data和插值表达式
<template>
	<view class="content">
		<view class="">
			{{title}}
		</view>
		<view class="">
			{{msg}}
		</view>
	</view>
</template>

<script>
	export default {
		data() {
			return {
				title: 'Hello uniapp',
				msg: '哈哈哈哈',
			}
		}
	}
</script>
(2) 绑定事件
三种常见的事件
绑定点击事件 @click
<template>
	<view class="">
		<!-- 标题 -->
		<view> {{title}}  </view>
		<!-- msg -->
		<view> {{msg}} </view>

		<button @click="updateTitle">修改标题</button>
	</view>
</template>

<script>

	export default {
		data() {
			return {
				title: 'vue语法2222',
				msg: '我爱vue'
			}
		},

		// 方法
		methods: {
			updateTitle() {
				this.title = 'hello vue';
			},
		}
	}
</script>
绑定input事件 @input
输入框组件输入内容时会触发input事件
<template>
	<view class="content">
		<input type="text" @input="oninput">
	</view>
</template>

<script>
	export default {
		methods: {
			oninput(event) {
				console.log(event);
				// event.detail.value 输入的内容
				console.log(event.detail.value);
			}
		}
	}
</script>
绑定change事件
单选框, 多选框, 下拉列表修改内容时会触发change事件
<template>
	<view>
		<radio-group @change="onchange">
			<radio/>
			<radio/>
		</radio-group>

		<checkbox-group @change="onchange">
			<checkbox/>
			<checkbox/>
		</checkbox-group>
	</view>
</template>

<script>
	export default {
		methods: {
			onchange(event) {
				console.log(event);
			}
		}
	}
</script>
uview组件的事件
<template>
	<view>
		<u-navbar title="个人中心" @leftClick="leftClick" @rightClick="rightClick"  right-text="编辑">
		</u-navbar>
	</view>
</template>

<script>
	export default {
		methods: {
			rightClick() {
				console.log('rightClick');
			},
			leftClick() {
				console.log('leftClick');
			}
		}
	}
</script>
事件传参
<template>
	<view>
		<button @click="onclick('北京')">北京</button>
		<button @click="onclick('上海')">上海</button>
		<button @click="onclick('广州')">广州</button>
		<button @click="onclick('深圳')">深圳</button>
	</view>
</template>

<script>
	export default {
		methods: {
			onclick(city) {
				alert(city);
			}
		}
	}
</script>

<style>
	view {
		display: flex;
		justify-content: center;
	}
</style>
(3) vue指令
vue常见指令有
- v-on 简写@, 比如@click, 就是上面的绑定事件
- v-model 双向数据绑定
- v-bind, 绑定属性, 简写:xxx, 比如:src="xxxx"
- :src 绑定src属性
- :class 绑定class属性
- v-for 渲染列表
- v-if 条件渲染
例1. v-model 双向数据绑定
<template>
	<view class="box">
		<input type="text" v-model="msg">

		<view class="">
			{{msg}}
		</view>
	</view>
</template>

<script>
	export default {
		data() {
			return {
				msg: '222'
			}
		}
	}
</script>
例2.1 绑定图片地址
src可以绑定变量, 其它属性也是同样道理
<template>
	<view class="box">
		<!-- 地址是固定的 -->
		<img src="https://www.baidu.com/img/PCtm_d9c8750bed0b3c7d089fa7d55720d6cf.png" alt=""> <br>
		<!-- 地址不固定 -->
		<img v-bind:src="url" alt=""> <br>
		<!-- 简写 -->
		<img :src="url" alt="">
	</view>
</template>

<script>
	export default {
		data() {
			return {
				url: 'http://static.huruqing.cn/fresh/banner1.jpeg',
			}
		}
	}
</script>
例2.2 绑定class
<template>
	<view class="aa" :class="{bb: isRed, cc: true}">
		 绑定class
	</view>
	</view>
</template>

<script>
	export default {
		data() {
			return {
				isRed: false
			}
		}
	}
</script>

<style>
	.aa {
		border: 1px solid red;
	}
	.bb {
		color: red;
	}
</style>
例3.1 渲染列表(简单列表)
<template>
	<view class="box">
		<view v-for="(letter,index) in list">
			{{index+1}}.  {{letter}}
		</view>
	</view>
</template>

<script>
	export default {
		data() {
			return {
				list: ['a','b','c','d']
			}
		}
	}
</script>
例3.2 渲染复杂列表
<template>
	<view class="box">
		<view v-for="(user,index) in list">
			{{index+1}}.  {{user.username}}   {{user.age}}岁
		</view>
	</view>
</template>

<script>
	export default {
		data() {
			return {
				list: [
					{ username: "张三1", age: 18, id: 1 },
					{ username: "张三2", age: 18, id: 2 },
					{ username: "张三3", age: 18, id: 3 },
					{ username: "张三4", age: 18, id: 4 },
					{ username: "张三5", age: 18, id: 5 },
					{ username: "张三6", age: 18, id: 6 },]
				}
		}
	}
</script>
例3.3 渲染商品列表
<template>
	<view class="page home">
		<view class="swiper">
			<image src="http://static.huruqing.cn/fresh/banner1.jpeg" mode=""></image>
		</view>


		<view class="list">
			<navigator v-for="item in list" url="/pages/detail/detail" class="item">
				<image
					:src="item.imgUrl"
					mode=""></image>
				<view class="box">
					<view class="name f16">{{item.masterName}}</view>
					<view class="f14 desc">基地果园现摘现发 鲜甜红润肉厚 富含维生素</view>
					<view class="price f14">¥{{(item.minPrice/100).toFixed(2)}}</view>
				</view>
				<u-icon name="shopping-cart" size="35px"></u-icon>
			</navigator>
		</view>
	</view>
</template>

<script>
	export default {
		data() {
			return {
				list: [{
						"categoryName": "时令鲜果",
						"categoryId": 145,
						"productId": 105987280,
						"masterName": "【山东】金秋红蜜桃",
						"slaveName": "基地果园现摘现发 鲜甜红润肉厚 富含维生素",
						"inventory": 9998,
						"maxPrice": 5990,
						"minPrice": 5780,
						"imgUrl": "https://mall.s.maizuo.com/86d8414272e50b4b9a7b185ac30dfc86.png?x-oss-process=image/resize,w_180"
					},
					{
						"categoryName": "时令鲜果",
						"categoryId": 145,
						"productId": 104553417,
						"masterName": "【云南】实建褚橙 10斤装 (95-135g/枚)",
						"slaveName": "源自“花腰傣之乡” 鲜甜脆嫩多汁 富含维C营养",
						"inventory": 9931,
						"maxPrice": 9800,
						"minPrice": 9800,
						"imgUrl": "https://mall.s.maizuo.com/c8ae4728163788cda4147e1ed8c44409.png?x-oss-process=image/resize,w_180"
					},
					{
						"categoryName": "时令鲜果",
						"categoryId": 145,
						"productId": 104015233,
						"masterName": "【海南】红心火龙果礼盒装 5斤装(5-7枚)",
						"slaveName": "基地果园采摘 鲜嫩爽口水润 富含天然花青素",
						"inventory": 9953,
						"maxPrice": 6990,
						"minPrice": 6990,
						"imgUrl": "https://mall.s.maizuo.com/14a9e655a578abe935f8c150b6d85592.png?x-oss-process=image/resize,w_180"
					},
					{
						"categoryName": "时令鲜果",
						"categoryId": 145,
						"productId": 104452666,
						"masterName": "【云南】新鲜冰糖橙 5斤装 (果径60mm+/枚)20-30个",
						"slaveName": "生态果园采摘 肉厚清甜多汁 富含维C营养",
						"inventory": 99290,
						"maxPrice": 2990,
						"minPrice": 2990,
						"imgUrl": "https://mall.s.maizuo.com/0238d75b8a9e13c5a18df9781c296c83.png?x-oss-process=image/resize,w_180"
					},
					{
						"categoryName": "时令鲜果",
						"categoryId": 145,
						"productId": 94217104,
						"masterName": "【山西】红富士苹果 8-10枚5斤装(果径80mm/枚)",
						"slaveName": "生态基地种植 饱满圆润脆甜 皮薄肉厚多汁",
						"inventory": 9053,
						"maxPrice": 3480,
						"minPrice": 3480,
						"imgUrl": "https://mall.s.maizuo.com/9aba9f63c14a9aa7d469b62a0f9cde41.png?x-oss-process=image/resize,w_180"
					}
				]
			}
		}
	}
</script>

<style>
	page {
		background-color: #f4f4f4;
	}

	.swiper image {
		width: 100%;
	}

	.list {
		background-color: #fff;
	}

	.list .item {
		display: flex;
		justify-content: space-between;
		align-items: center;
		padding: 8px;
	}

	.list .item image {
		width: 100px;
		height: 100px;
		background-color: #f4f4f4;
	}

	.list .box {
		flex-grow: 1;
		margin-left: 5px;
	}

	.list .item .desc {
		padding-right: 10px;
	}

	.f16 {
		font-size: 32rpx;
	}

	.f14 {
		font-size: 28rpx;
	}

	.list .price {
		color: #c03131;
	}
</style>
例4.1 条件渲染(分支结构)
<template>
	<view class="box">
		<view v-if="show">aaaaaaaaa</view>
		<view v-else>bbbbbbbbb</view>

		show: {{show}}
	</view>
</template>

<script>
	export default {
		data() {
			return {
				show: false,
			}
		}
	}
</script>
例4.2 三目运算符
<template>
	<view class="box">
		<view type="primary">{{aa?'aaaaaaaaa':'bbbbbbbbb'}}</view>
		{{aa}}
	</view>
</template>

<script>
	export default {
		data() {
			return {
				aa: true,
			}
		}
	}
</script>
例4.3 显示和隐藏
<template>
	<view class="box">
		<button type="primary" @click="onclick">{{show?'隐藏':'显示'}}</button>
		<view class="list" v-if="show">
			<view>xxxx</view>
			<view>xxxx</view>
			<view>xxxx</view>
		</view>
	</view>
</template>

<script>
	export default {
		data() {
			return {
				show: true,
			}
		},
		methods:{
			onclick() {
				this.show = !this.show;
			}
		}
	}
</script>
(4) 练习和作业
实现简单的登录功能
- 没登录时, 显示立即登录
- 已登录则显示电话号码和退出按钮
<template>
	<view class="page">
		<view class="box">
			<text>13800000000</text>
			<button type="primary">退出</button>
		</view>
		<view class="box">
			<text>你还没登录,</text>
			<button type="info">立即登录</button>
		</view>
	</view>
</template>

<style>
	page {
		padding: 20px;
	}
	.box {
		display: flex;
		align-items: center;
	}
	button {
		margin-left: 10px;
	}
</style>
顶部tab栏效果切换
参考 http://villa.huruqing.cn 里发现页面
- 点击那个tab那个tab就高亮
<template>
	<view class="box">
		<text class="item active">路线</text>
		<text class="item">美墅</text>
		<text class="item">活动</text>
	</view>
</template>

<style>
	page {
		background-color: #f4f4f4;
	}
	.box {
		height: 50px;
		background-color: #fff;
		display: flex;
		justify-content: space-around;
		align-items: center;
	}
	.item {
		height: 100%;
		display: flex;
		align-items: center;
	}
	.active {
		color: red;
		border-bottom: 2px solid red;
	}
</style>
购物车的编辑功能
参考 http://fresh.huruqing.cn 购物车页面
- 点击编辑, 显示完成, 点击完成显示编辑
- 购物车数量和步进器的展示与隐藏
- 删除和计算文字的切换
--------------------------
🕒 day06 服务器相关
(一) 请求服务器数据
(1) 什么是服务器接口&接口地址
(2) uniapp提供请求服务器数据的方法
<template>
	 <view class="">

	 </view>
</template>

<script>
	export default {
		onShow() {
			uni.request({
				url: 'http://81.71.65.4:3008/cinema/list',
				// 请求参数
				data: {
					cityName: '深圳'
				},
				success(res) {
					console.log(res);
				}
			})
		}
	}
</script>
(3) 封装请求
第一步: 根目录新建api.js
const baseUrl = 'http://81.71.65.4:3003';  // 唯一要改的地方

const request = (url,data={}, method='GET')=> {
	uni.showLoading({
		title:'努力加载中...'
	})
	return new Promise((resolve,reject)=> {
		uni.request({
			url: baseUrl+url,
			method,
			data,
			success: (res) => {
				if (res.data.code == 666) {
					resolve(res.data);
				} else {
					uni.showToast({
						icon: 'error',
						title: '网络请求失败'
					})
					reject(res.data.msg);
				}

			},
			fail: (err) => {
				uni.showToast({
					icon: 'error',
					title: '网络请求失败'
				})
				reject('网络请求失败');
			},
			complete: () => {
				uni.hideLoading();
			}
		})
	})
}


export const get = (url,data={})=> {
	 return request(url,data,'GET');
}
export const post = (url,data={})=> {
	 return request(url,data,'POST');
}
**第2步:**修改main.js
import App from './App'
import {get,post} from './api.js'

// #ifndef VUE3
import Vue from 'vue'
Vue.config.productionTip = false
// 用$get是为区别一边的方法, 用get也是可以的
Vue.prototype.$get = get
Vue.prototype.$post = post
...
第3步: 请求数据
在任意一个页面执行以下代码
<script>
	export default {
		onShow() {
			this.$get('/product/list',{currPage: 2}).then(function(res) {
				console.log(res);
			})
		}
	}
</script>
(二) 调试接口
使用apifox进行测试: https://app.apifox.com/main
也可以使用postman, 注册账号, 登录网站后
(1) 新建项目
(2) 配置环境
(3) 测试请求
(三) 创建服务器接口(略)
- 定义好模块名称(英文)
- 创建接口
- apifox测试接口
--------------------------
🕒 day07 项目运行和打包
(一)模拟器运行项目

(二) 项目打包
(1) 打包成h5
- 点击根目录的
manifest.json - 在侧边栏找到
web配置 - 找到运行基础路径, 修改
./ - 选择项目 => 点击发行 => 网站 进行打包
- 打包后, 打开打包目录, 双击index.html就可以运行
(2) 打包成小程序
(3) 打包成app
- 本地打包(略)
参考链接:
--------------------------
(三) app上架全流程
🕒 day08/day09 项目实战
(1) 生鲜首页代码
<template>
	<view class="page home">
		<view class="swiper">
			<image src="http://static.huruqing.cn/fresh/banner1.jpeg" mode=""></image>
		</view>

		<view class="tabs">
			<u-tabs @click="changeTab" :list="tabList"></u-tabs>
		</view>

		<view class="list">
			<navigator v-for="item in productList" url="/pages/detail/detail" class="item">
				<image :src="item.imgUrl"></image>
				<view class="box">
					<view class="name f16">{{item.masterName}}</view>
					<view class="f14 desc">{{item.slaveName}}</view>
					<view class="price f14">¥{{(item.minPrice/100).toFixed(2)}}</view>
				</view>
				<u-icon name="shopping-cart" size="35px"></u-icon>
			</navigator>
		</view>
	</view>
</template>

<script>
	export default {
		data() {
			return {
				tabList: [{
					name: '时令鲜果',
				}, {
					name: '海鲜水产',
				}, {
					name: '五谷杂粮'
				}],
				// 商品列表
				productList: [],

			}
		},

		onShow() {
			this.getProductList('时令鲜果');
		},

		methods: {
			// 获取商品列表
			getProductList(typeName) {
				var data = {
					typeName: typeName,
				}
				this.$get('/product/list',data).then((res)=>{
					this.productList = res.list;
				})
			},

			changeTab(item) {
				console.log(item);
				this.getProductList(item.name);

			}

		}
	}
</script>

<style>
	page {
		background-color: #f4f4f4;
	}

	.swiper image {
		width: 100%;
	}

	/*
	.tabs {
		background-color: #fff;
		display: flex;
		justify-content: center;
	} */

	.list {
		background-color: #fff;
	}

	.list .item {
		display: flex;
		justify-content: space-between;
		align-items: center;
		padding: 8px;
	}

	.list .item image {
		width: 100px;
		height: 100px;
		background-color: #f4f4f4;
	}

	.list .box {
		flex-grow: 1;
		margin-left: 5px;
	}

	.list .item .desc {
		padding-right: 10px;
	}

	.f16 {
		font-size: 32rpx;
	}

	.f14 {
		font-size: 28rpx;
	}

	.list .price {
		color: #c03131;
	}
</style>
(2) css溢出用省略号显示
width: 150px;
white-space: nowrap;
overflow: hidden;
text-overflow: ellipsis;
(3) 电影首页的轮播图
<template>
	<u-swiper :list="list1"></u-swiper>
</template>

<script>
	export default {
		data() {
			return {
				list1: [
					'https://cdn.uviewui.com/uview/swiper/swiper1.png',
					'https://cdn.uviewui.com/uview/swiper/swiper2.png',
					'https://cdn.uviewui.com/uview/swiper/swiper3.png',
				]
			}
		},

		onShow() {
			this.getBanners();
		},

		methods: {
			// 获取轮播图列表
			getBanners() {
				this.$get('/film/banners').then((res) => {
					this.list1 = res.data.map(function(item) {
						return item.imgUrl;
					});
				})
			}
		}
	}
</script>
(4) 格式化时间
// 处理日期
formatDate(time) {
    // 创建一个日期对象
    var date = new Date(time);
    console.log(date);
    var Y = date.getFullYear(); // 年
    var M = date.getMonth() ; // 月
    var D = date.getDate(); // 日
    // 如果月份和日是个位数, 在其前面加0
    M = M<10?'0'+M:M;
    D = D<10?'0'+D:D;
    return Y + '-' + M + '-' + D;
}
🕒 day10 项目演示
上台演示所做项目